> ## Documentation Index
> Fetch the complete documentation index at: https://developers.hubspot.com/docs/llms.txt
> Use this file to discover all available pages before exploring further.
---
id: 8bee4d5c-3818-4a6f-bf99-a59cdbb80722
---
# Migrate an existing public app to the projects framework
> Learn how to migrate an existing public app to the projects framework.
The latest version (`2025.2`) of the developer platform features a new file-based build and deploy framework. This framework contains an app's configuration, assets, and other source code.
If you have an [existing public app](/docs/apps/legacy-apps/public-apps/overview) you created directly within your developer account or via a project on version 2025.1 of the developer platform, this guide will walk you through how to migrate it over to the latest version of the projects framework.
Before you proceed with the migration, review the three sections below on [prerequisites](#prerequisites), [supported features](#supported-app-features-and-extensions), and [limitations](#limitations).
## Prerequisites
* Make sure you've [installed the latest version](/docs/developer-tooling/local-development/hubspot-cli/install-the-cli) of the HubSpot CLI.
* If your existing project has a card with custom objects connected, confirm that you have the `crm.objects.custom.read` scope on your app before migration, which is required to access custom data in the latest version (2025.2) of the developer platform. For projects built before the latest version of `2025.2`, custom object cards could be built with only the `crm.schemas.custom.read` scope required.
## Supported app features and extensions
Unless otherwise noted in the [limitations section](#limitations) below, any [public app features](/docs/apps/developer-platform/overview#features) supported by projects will be included in the migration, such as:
* App configuration
* Webhooks
* Custom workflow actions
**Migrating timeline events**
Once you migrate an app with a `v1`/`v3` timeline event, you’ll have 7 days to update any `v1`/`v3` timeline event API requests to the new `v4` endpoints. After 7 days, calls to `v1`/`v3` timeline events endpoints will return `401` errors.
Before migrating an app with a timeline event, learn more about [creating and managing event types](/docs/apps/developer-platform/add-features/app-events/create-and-manage-event-types) and [sending event occurrence data](/docs/apps/developer-platform/add-features/app-events/send-event-occurrences) on the new developer platform.
## Limitations
The following features are not currently supported for migration:
* Support for the [GitHub integration](/docs/developer-tooling/third-party-tools/set-up-github-actions), which triggers automatic uploads and builds from GitHub, is not yet available. If your project is currently linked to GitHub, make sure you disable the integration before you begin the migration. To disable the GitHub integration and set up GitHub Actions for automating CI/CD, check out the instructions in [this article](/docs/developer-tooling/third-party-tools/set-up-github-actions).
* If you created a [settings page](/docs/apps/legacy-apps/public-apps/create-an-app-settings-page) for your app, you'll need to refactor your settings experience using the new UI extensions feature. It's recommended that you note all of the interface elements in the current production version of your app before migrating it to the latest version. After the migration process is complete, you can use the new UI extension features to recreate your settings page.
* The [classic CRM card](/docs/api-reference/latest/crm/extensions/crm-cards/guide) functionality is not supported for apps using the latest version of developer projects. You'll need to refactor any existing CRM cards to use the [app card schema](/docs/apps/developer-platform/add-features/ui-extensions/extension-points/app-cards/reference#app-card-schema) instead.
* Your app's underlying permission architecture will be updated to support more granular user-specific permissions. As part of this transition, new customer installations will now have an associated service account user created in their account, which is tied to your app.
* Each account will now only receive one refresh token, regardless of how many individual users reauthorize the app.
* Existing [OAuth endpoints](/docs/api-reference/legacy/authentication/manage-oauth-tokens#retrieve-access-token-metadata) that retrieve refresh and access token metadata will still return the user who installed it as the `userId`, and will now return a `serviceAccountId` after your app is migrated.
## Migrate your app
Once you've reviewed the considerations in the section above, you can proceed to migrate your app. This process will preserve the original authentication credentials, app features, and installs for the app. No changes are required in your app's backend.
* Make sure you've installed the latest version of the HubSpot CLI by running the command `npm i -g @hubspot/cli@latest` and connected it to your account using `hs auth` and `hs accounts use` commands.
The CLI needs to be version `7.6.0` or later. You can check which version of the CLI you have by running `hs --version`. Run the command `npm install -g @hubspot/cli@latest` to update your version of the HubSpot CLI if needed.
* To kick off the migration process, use one of the following commands based on the existing app you're migrating:
* If you're migrating a legacy app that's not part of a project, run the following command:
```shell theme={null}
hs app migrate
```
If you're migrating a project-based app, run the command `hs project migrate`.
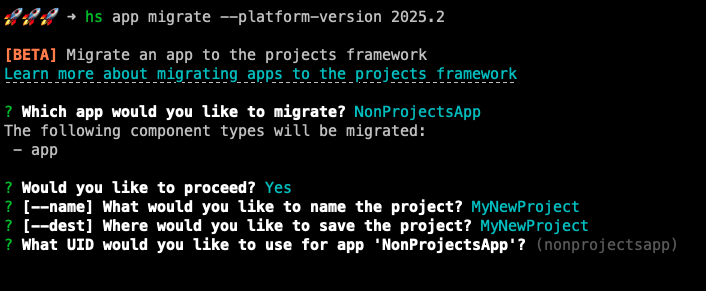
* You'll be prompted to choose the app you want to migrate. This will create a new project in your local filesystem containing an app, along with its features that represent its currently configured state.
* After selecting the app, you'll be prompted for confirmation of the components that will be migrated. Make sure you fully understand the migration process before confirming to the next step.
* Next, you'll be prompted to provide a project name, a local path to the new project, and any required UIDs.
UIDs should be used as a unique identifier for all of your app’s features. Once a UID is defined for a specific feature, changing or modifying it in subsequent builds will force the platform to recognize it as “new” or different from previous builds, which might not be intended.
 * Once you confirm the details for your project, the migration process will automatically perform the following actions as a single operation:
* Create a project for your app in your account's *Projects* page, which includes an app component and any compatible features.
* Convert any existing features of the app to source code files, which you can update to revise their configuration in the future.
* Build and deploy the new project (which will be labeled as *Build #1*), which completes the association between the app and its project. This will preserve the original auth credentials, app features, and installs.
* Download the new project source files to the local directory you specified earlier when prompted in the terminal.
* If an existing project was migrated, move the files from the original `src/` directory to `archive/` and populate `/src/` with the new project source code.
* Once you confirm the details for your project, the migration process will automatically perform the following actions as a single operation:
* Create a project for your app in your account's *Projects* page, which includes an app component and any compatible features.
* Convert any existing features of the app to source code files, which you can update to revise their configuration in the future.
* Build and deploy the new project (which will be labeled as *Build #1*), which completes the association between the app and its project. This will preserve the original auth credentials, app features, and installs.
* Download the new project source files to the local directory you specified earlier when prompted in the terminal.
* If an existing project was migrated, move the files from the original `src/` directory to `archive/` and populate `/src/` with the new project source code.
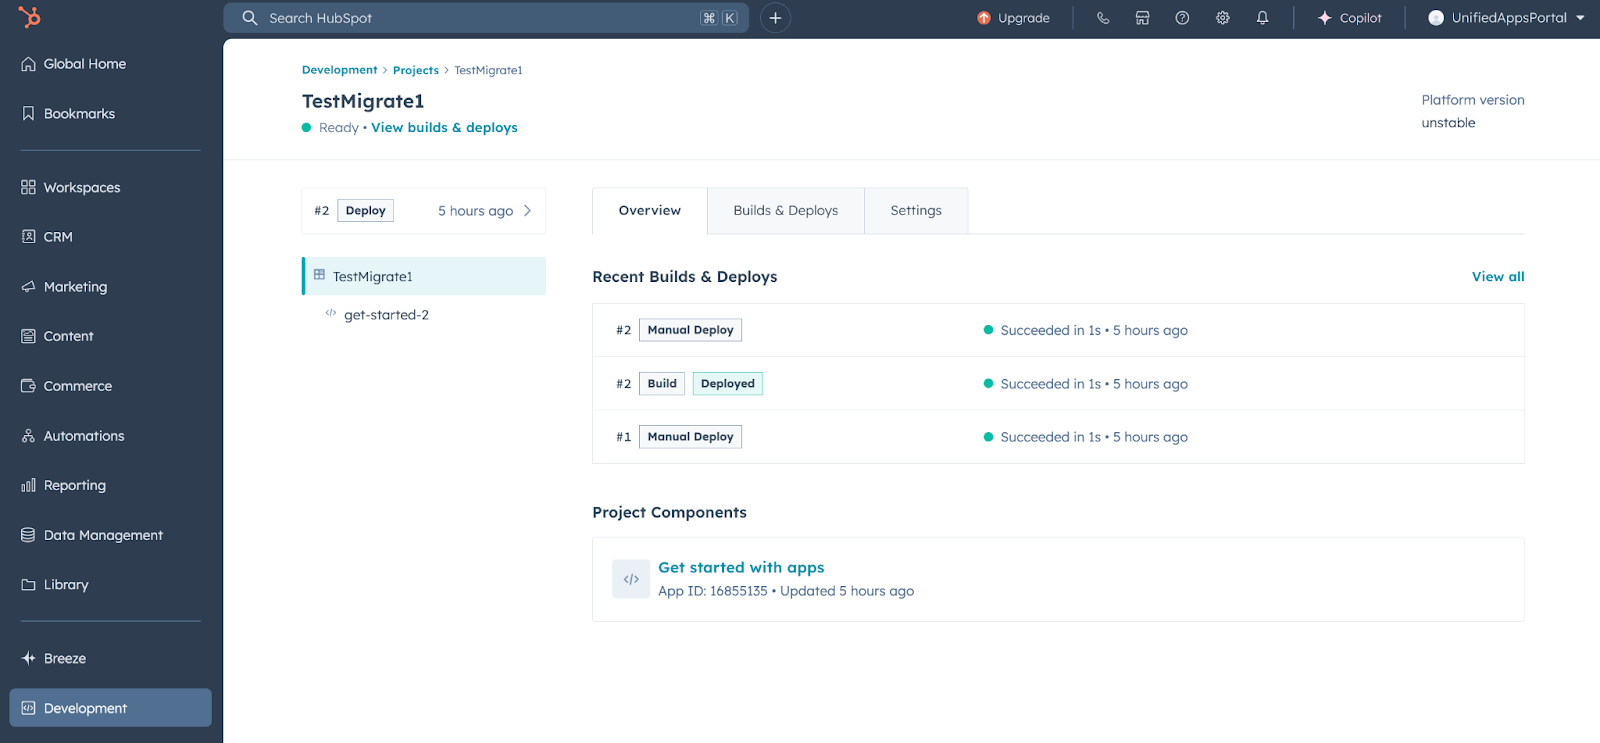 *Build #1* of the new project captures the app's configuration state for all supported features as baseline you can return to. If needed, you can safely revert any future changes to this project (e.g., adding React-based app cards) by redeploying **build #1**.
After migration, features represented in project source files must be managed locally through the project. These features are no longer editable through the app management UI within HubSpot or previous developer APIs. App features that aren't represented in project source files should continue to be managed through their existing APIs.
## Next steps
With the migration complete (as reflected by the `"platformVersion": "2025.2"` field in your `hsproject.json` file), you can now begin developing new or existing features, using the HubSpot CLI and your project's source code files.
* If your legacy public app is listed on the [HubSpot Marketplace](https://ecosystem.hubspot.com/marketplace/apps) and included support for [legacy CRM cards](/docs/api-reference/latest/crm/extensions/crm-cards/guide), you can use the [feature flags API](/docs/api-reference/legacy/app-management/feature-flags/guide) to provide a smooth migration experience for users who installed your app in their HubSpot account.
* Learn more about creating [app cards](/docs/apps/developer-platform/add-features/ui-extensions/extension-points/app-cards/create-an-app-card) on the new developer platform.
* Learn how to create a [settings page](/docs/apps/developer-platform/add-features/ui-extensions/extension-points/create-a-settings-page) for your app.
* Consult the [app configuration](/docs/apps/developer-platform/build-apps/app-configuration) reference article to familiarize yourself with the project structure of your migrated app.
* Check out the [projects CLI](/docs/developer-tooling/local-development/hubspot-cli/project-commands) reference, or review the [full list of CLI commands](/docs/developer-tooling/local-development/hubspot-cli/reference).
*Build #1* of the new project captures the app's configuration state for all supported features as baseline you can return to. If needed, you can safely revert any future changes to this project (e.g., adding React-based app cards) by redeploying **build #1**.
After migration, features represented in project source files must be managed locally through the project. These features are no longer editable through the app management UI within HubSpot or previous developer APIs. App features that aren't represented in project source files should continue to be managed through their existing APIs.
## Next steps
With the migration complete (as reflected by the `"platformVersion": "2025.2"` field in your `hsproject.json` file), you can now begin developing new or existing features, using the HubSpot CLI and your project's source code files.
* If your legacy public app is listed on the [HubSpot Marketplace](https://ecosystem.hubspot.com/marketplace/apps) and included support for [legacy CRM cards](/docs/api-reference/latest/crm/extensions/crm-cards/guide), you can use the [feature flags API](/docs/api-reference/legacy/app-management/feature-flags/guide) to provide a smooth migration experience for users who installed your app in their HubSpot account.
* Learn more about creating [app cards](/docs/apps/developer-platform/add-features/ui-extensions/extension-points/app-cards/create-an-app-card) on the new developer platform.
* Learn how to create a [settings page](/docs/apps/developer-platform/add-features/ui-extensions/extension-points/create-a-settings-page) for your app.
* Consult the [app configuration](/docs/apps/developer-platform/build-apps/app-configuration) reference article to familiarize yourself with the project structure of your migrated app.
* Check out the [projects CLI](/docs/developer-tooling/local-development/hubspot-cli/project-commands) reference, or review the [full list of CLI commands](/docs/developer-tooling/local-development/hubspot-cli/reference).