In order for an app to be listed or certified on the HubSpot Marketplace, the listing must include a publicly available setup guide URL.
Please note:You can create separate guides for installing, configuring, using, disconnecting, and uninstalling your app, but all guides must meet the requirements and be linked to the Setup documentation URL included on your HubSpot Marketplace listing.
Setup guide requirements
In order to be listed on the HubSpot Marketplace, your app must include a setup guide that meets the following requirements:
- Not hidden behind a paywall or sign-in screen.
- Specific to setting up your app, i.e. you cannot link to your website homepage or knowledge base homepage.
- Contains the steps to install and configure the integration.
Learn more about the full requirements for listing your app or check out an example of a listed setup guide from OrgChartHub.
In order to be certified on the HubSpot Marketplace, your app must include a setup guide that meets the following requirements, in addition to the above:
- Adheres to current accessibility, privacy, and GDPR standards.
- Is consistent with the current version of your app and HubSpot.
- Includes images. Videos are recommended, but not required.
- Includes the following information:
- What your app does.
- How to install your app.
- How to connect a HubSpot account to your app.
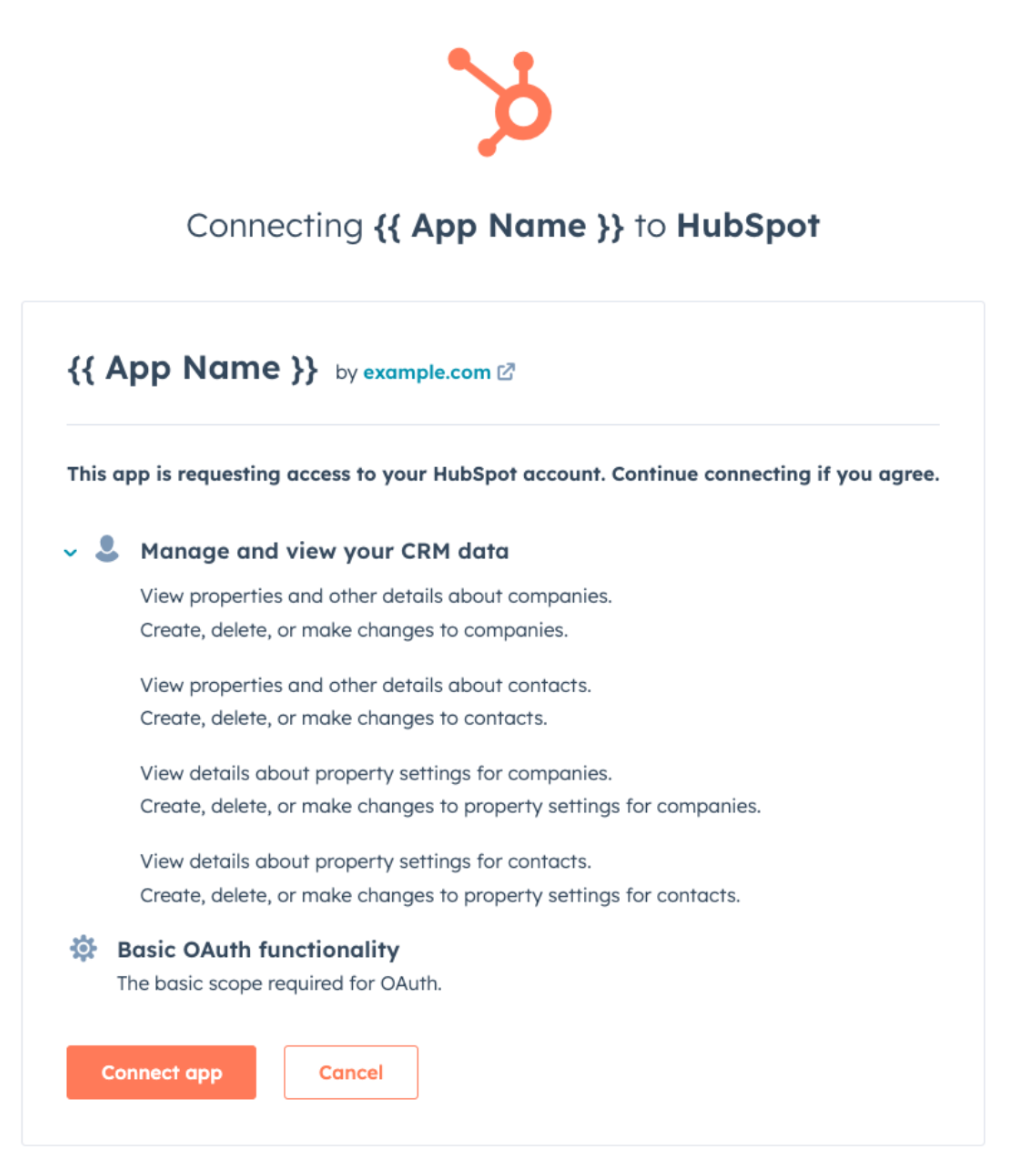
- Screenshots of each step of the installation process, including the scope approval screen.
- How to configure your app, once installed.
- How to use your app, including both automated and manual interactions.
- How to disconnect a HubSpot account from your app.
- How to uninstall your app from a HubSpot account.
- Potential consequences to user data from disconnecting and uninstalling your app.
Learn more about the full requirements for certifying your app.
Setup guide template
The following template uses best practices for creating a setup guide. Using this format is not required, but the template is designed to give your app a strong probability of meeting HubSpot’s requirements for both listing and certification.
Setup guide for [App Name]
[App Name] integrates [Platform Name] leads and accounts with HubSpot contacts and companies, which lets users:
- [Description of a use case]
- [Description of an additional use case]
Install the app
[Describe instructions to install your app and connect a HubSpot account, with visual aids for each step.] For example:
- Log in to [Platform Name].
- Navigate to Settings > Integrations.
- Locate the [App Name] card.
- [Include a screenshot here.]
- Click Install.
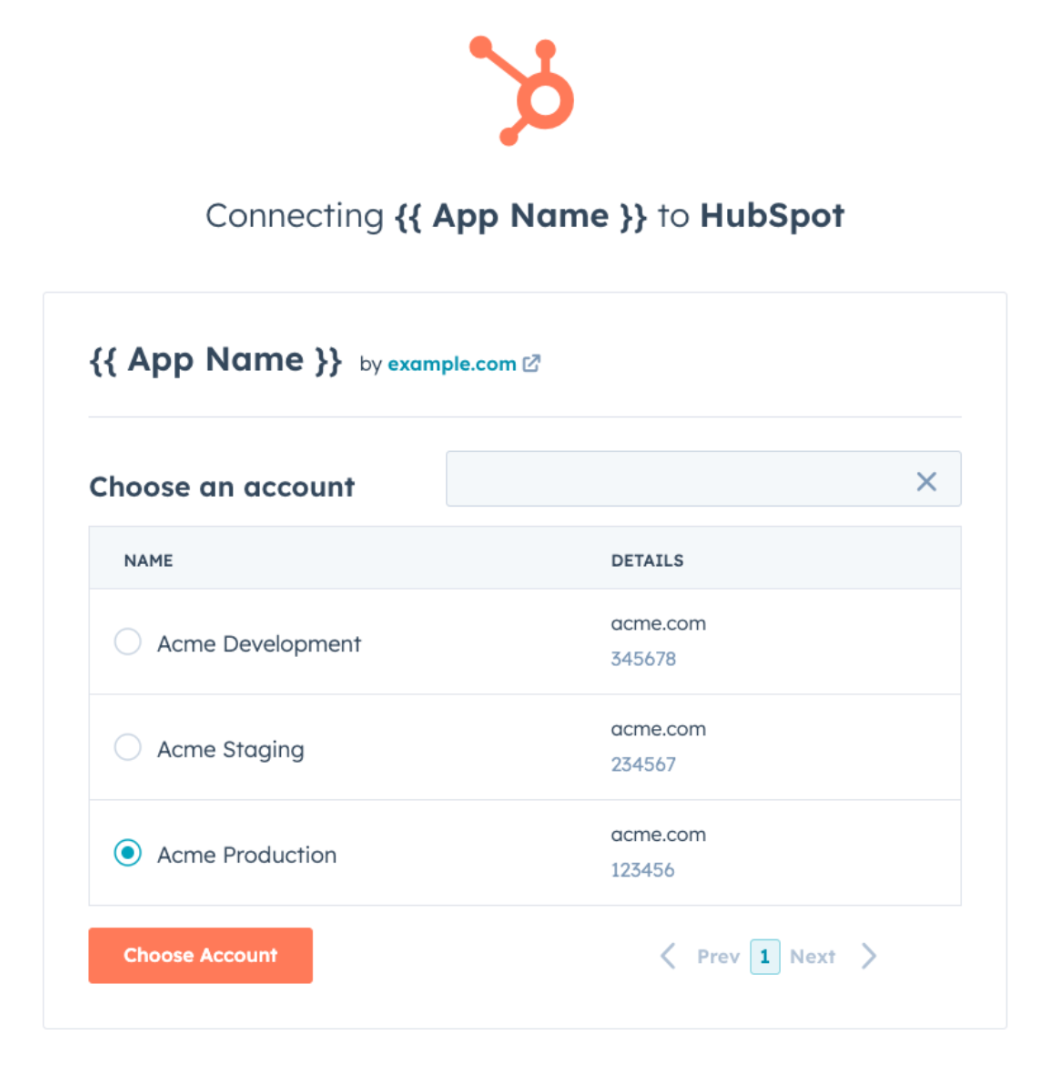
- Select your HubSpot account.
- Click Choose Account.
- Review the requested scopes on this screen. [App Name] requests access to read and write contacts & companies, as well as read and edit contact & company properties.
- Click Connect app.
- You will be redirected to the [Platform Name] “Integrations” page, and new configuration options will appear.
[Describe instructions to configure your app’s connection to HubSpot, including visual aids for each step.]
- In your [Platform Name] account, navigate to Settings > Integrations > [App Name].
- Toggle Sync direction to select how data will sync:
- One-way: [App Name] will only update HubSpot.
- Two-way: [App Name] will keep [Platform Name] and HubSpot in sync.
- [Include a screenshot here.]
- Map your [Platform Name] lead and account fields to contact and company properties in HubSpot.
- [Include a screenshot here.]
- When ready, click to toggle the Sync switch on.
- [Include a screenshot here.]
- Select either Sync existing records or Sync only new records.
- [Include a screenshot here.]
- Click Done.
Use the app
[Describe how to perform basic manual and/or automated actions with your app with relevant visual aids.] For example:
[App Name] automatically keeps your [Platform Name] leads and accounts synced with your HubSpot contacts and companies, according to the settings configured in the previous section. Syncs run at least every 5 minutes. No manual actions are required.
Disconnect the app
[Describe instructions to disconnect a HubSpot account from your app, including visual aids for each step. You should also describe how disconnecting affects users’ HubSpot accounts and data.] For example:
Note: If you disconnect your HubSpot account from [App Name], [Platform Name] lead & account data will no longer sync to HubSpot contacts & companies and vice versa. Existing data will remain on your HubSpot records.
- Log in to [Platform Name].
- Navigate to Settings > Integrations.
- Locate the [App Name] card.
- [Include a screenshot here.]
- Click Disconnect.
- [Include a screenshot here.]
- Click Yes, I am sure.
Uninstall the app
[Describe instructions to uninstall your app from within a HubSpot account. You may simply link and refer to the HubSpot Knowledge Base article on this topic.] For example:
To uninstall [App Name] from your HubSpot account, follow the instructions in this HubSpot Knowledge Base article.