
Managing authentication and account configuration
Thehs account and hs config commands and their associated subcommands provide a streamlined way for you to manage authenticated HubSpot accounts, link specific authenticated accounts to a directory, and manage other configuration options.
When you run the hs account auth command for the first time, a global config file will be created at ~/.hscli/config.yml. This file will store the metadata for your authenticated accounts and the account set as your global default.
When working across multiple project directories, you can link a specific authenticated account to a directory using the hs account link command.
- For example, if you work on a production app in one directory and a sandbox project in another, you can explicitly link specific accounts to each directory to prevent accidentally running a command against the wrong account.
- Each linked directory can also have its own default account, which takes precedence over the global default when running commands from that directory.
If you’re using the older
hubspot.config.yml file to manage your config, you’ll need to migrate to the newer ~/.hscli/config.yml config file using the hs config migrate command.You can also migrate from the older per-directory override model defined by a .hsaccount file by running hs account link in the same directory as an existing .hsaccount file.Account and authentication commands
Review the commands below to learn how to authenticate your HubSpot account or manage existing authenticated accounts.Authenticate an account
Generate authentication for a HubSpot account using a personal access key.You can also use the older
hs auth command to manage authentication via a hubspot.config.yml file, but it’s recommended that you use the newer hs account auth command for new app development moving forward, as it uses a global configuration file to manage authentication across multiple accounts.List authenticated accounts
Lists the name, ID, and auth type for each account in your config file, along with linked directory and account settings. If you’re not seeing the accounts you expect, you may need to run the auth command to add accounts to your config file.Get account info
View information about the default account, or a specific authenticated account (including linked accounts).Set default account
Set the default account in your config file. If executed inside a linked directory, it changes the default account for the linked directory instead of the global default.Remove an account
Removes an account from your config file.Remove invalid accounts
Removes any deactivated HubSpot accounts from your config file.Link an account
Link an authenticated account to the current working directory.hs account auth, navigate to a directory and run hs account link to select which accounts are relevant there. You can link multiple accounts (e.g., a production account and a sandbox) and set a default for the directory.
- Linked accounts are saved in a local
.hs/settings.jsonfile, which is added to.gitignoreautomatically so it won’t affect other developers on your team. You can commit this file if it fits your workflow better. - Once linked, all other commands will work seamlessly with your linked accounts (e.g.,
hs project dev,hs project deploy,hs cmscommands etc).
hs account link in a directory with an older per-directory override .hsaccount file, you’ll be prompted to migrate the override settings. Once confirmed, the .hsaccount file will be deleted in favor of a new .hs/settings.json file in the same directory.
Unlink an account
Unlink an authenticated account from the current working directory. Use this command when an account is no longer relevant to a directory.Override the default account in your global config
If you want to override the default account in the~/.hscli/config.yml global config file, you can run the following command in any directory:
.hsaccount file in your current working directory. This file will list a single account from your global config that will act as your default account for the current directory, along with any subdirectories and files. If needed, you can use the hs account remove-override command to remove this file from your current working directory.
hs init command (deprecated)
hs init command (deprecated)
Creates a Flags
hubspot.config.yml file in the current directory and sets up authentication for an account. If you’re adding authentication for a new account to an existing config file, run the auth command. When prompted for a name to use for the account, the name can’t contain spaces.Make API requests
Once you’ve authenticated your account usinghs account auth, you can make API requests using the CLI to any HubSpot endpoint associated with a granted permission when you generated your Personal Access Key.
For example, if you selected the CRM Objects permission when generating your PAK, you can make API requests to any endpoint that requires the crm.objects.contacts.read scope (e.g., the retrieve contacts endpoint).
Flags
Managing secrets
Add a secret
Add a secret to your account which can be used to reference authentication data you don’t want to expose in your project files. To expose the secret to your function, update your file with the secret’s name, either to the specific endpoints you want to use it in or globally to make it available to all.Update a secret
Update the value of a secret in your account which can be referenced in your project without exposing it directly in your source files.Remove a secret
Remove a secret from your account, making it no longer usable within your project files. You will be prompted to confirm the deletion before proceeding. You can use the--force flag to bypass this confirmation.
Flags
List secrets
List secrets within your account to know what you have stored already using the add secrets command.Sandbox commands
Interact with standard sandboxes and development sandboxes using the commands below.Create a sandbox
Creates a new sandbox in a production account. When running this command, you can select whether you want to create a standard sandbox or a development sandbox. If creating a standard sandbox, when running this command, all supported assets will be synced from production to the standard sandbox by default. You can choose to trigger a one-time sync of the last updated 5,000 contacts and, if applicable, up to 100 associated companies, deals, and tickets (for each associated object type). A production account can have one standard sandbox and one development sandbox at a time. Additional standard sandboxes can be purchased as an add-on. Learn more about development sandbox limits.Delete a sandbox
Deletes a sandbox connected to the production account. Follow the prompts to select the sandbox account to delete, then confirm the permanent deletion.Create and use development sandboxes
After following the steps above to connect a production account to the CLI for private app development, you can create a development sandbox within it to setup a lightweight testing environment. This enables you to develop your apps and extensions in a siloed environment before deploying to a production account. Before proceeding, review the following development sandbox limits:- A production account can have only one development sandbox at a time.
- CRM object definitions are synced from the production account to the development sandbox at the time of sandbox creation.
- You cannot create a sandbox within another sandbox.
Create a development sandbox
To set up a development sandbox account:-
Because development sandboxes are created within the
defaultPortalin yourhubspot.config.ymlfile, first confirm that your production account is connected and set as the default:-
In the terminal, run
hs account list. -
In your list of connected accounts, confirm that your production account is listed as the default account.
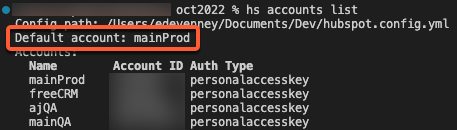
-
If your production account is not the default, run
hs account useand select your production account.
-
In the terminal, run
-
After confirming your production account is the default, run
hs sandbox create. - You’ll then be prompted to select a type of sandbox to create. Select Development sandbox, then press Enter.
-
Enter a
namefor the sandbox account, then press Enter. - All CRM object definitions will be copied from production to the development sandbox.
- You can use the import tool to import production object record data, or manually create sample data for testing.
- The CLI will then begin the sandbox setup process. Once the sandbox is fully set up and synced, you’ll see a Sandbox sync complete confirmation.
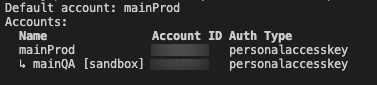
hs account list.
If you want to set the development sandbox as your default account, run hs account use, then select the sandbox. To deploy to your sandbox or production account, you can either run hs account use to set the default account, or manually select the account when uploading by running hs project upload --account=<name-of-account>.
 Development sandboxes are designed to be early proof of concept environments. It is recommended to delete and create a new Development Sandbox using the CLI. This ensures development sandboxes always have an exact mirror of the production account’s CRM object definitions when beginning new projects.
After setting up your development sandbox, learn how to create a UI extension, or learn more about creating apps.
Development sandboxes are designed to be early proof of concept environments. It is recommended to delete and create a new Development Sandbox using the CLI. This ensures development sandboxes always have an exact mirror of the production account’s CRM object definitions when beginning new projects.
After setting up your development sandbox, learn how to create a UI extension, or learn more about creating apps.
View a development sandbox in HubSpot
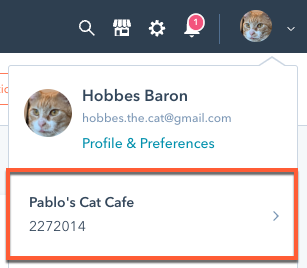
By default, all super admin users are synced to the development sandbox during creation. Super admins can give other users access by adding them as users to the development sandbox. To access the development sandbox account in HubSpot:- In your HubSpot account, navigate to CRM Development in the main navigation bar.
- In the left sidebar menu, select Sandboxes.
- Click the Development tab, where your new sandbox will be listed along with its name, create date, and the user who created it.
- To navigate to the sandbox account, click the development sandbox name.
Delete a development sandbox
- To delete a development sandbox using the CLI, run
hs sandbox delete, then follow the prompts. - To delete a development sandbox in HubSpot:
- In your HubSpot account, navigate to CRM Development in the main navigation bar.
- In the left sidebar menu, select Sandboxes.
- Click the Development tab.
- Hover over the development sandbox, then click Delete.
