
Understand limits and considerations
The updated install flow only applies to:- All apps listed on the HubSpot Marketplace that make changes in the listing editor.
- Customers installing the app for the first time. Existing customers who have already installed the app are not affected.
- Installs initiated from the HubSpot Marketplace. Installs initiated from external websites or the app itself are not affected.
- The app’s installation process once you publish changes in the listing editor. Until then, the app’s current installation process will not change.
Opt into using a new install experience early
You can choose to switch to one of the new install experiences any time before October 26, 2026. After this date, it will be required in all accounts to select an install experience when you next edit an app’s listing.- In your HubSpot account, navigate to Development. In the left sidebar menu, click App Listings.
- Hover over an app, then click the More dropdown menu and select Edit draft.

- In the Listing info section, click Enable Install Experience.

- In the dialog box, select the checkbox that shows you understand you can’t return to the previous install flow, then click Enable Install Experience.
- In the app listing editor, select an option in the Install experience section:
- Seamless install: installs in HubSpot with a guided OAuth flow. Best for apps that want a native install flow in HubSpot.
- Login via partner site: sends customers to an external sign-up or install flow. Best for apps that require additional setup.
- No install button: no install button appears on the app listing. Best for apps that can’t yet support an install flow. Users will be shown a contact us or demo request button.
- If you’re using the Seamless install experience:
- Click the Install Button URL dropdown menu and select a URL. These URLs are populated from the redirect URLs set in your app settings.
- In the Sign-in configuration section, select whether the app will require a separate partner sign-in.
- If you’re using the Login via partner site experience, enter an install button URL that leads to the page on your partner site where the customer can install the app.
Understand the Seamless install flow without partner sign in
Use the Seamless install flow
- In your HubSpot account, navigate to Development. In the left sidebar menu, click App Listings.
- Hover over an app, then click the More dropdown menu and select Edit draft.
- In the app listing editor, select Seamless install in the Install experience section:
- Click the Install Button URL dropdown menu and select a URL. These URLs are populated from the redirect URLs set in your app settings.
- In the Sign-in configuration section, select No partner login required, HubSpot OAuth only.
Developer perspective
1
Receive installation request
Your install URL endpoint receives a request with these parameters:
code: authorization code for completing the installation.returnUrl: URL used to direct the user back to HubSpot after installation completes. ThereturnUrlwill be added as a query parameter to the end of the Redirect URL selected in the listing editor when HubSpot redirects the customer there.step: always set tofinalize. You do not need to do anything with this parameter.
2
Complete installation
Once you receive the request, you should:
- Get the
codeandreturnUrlfrom the URL parameters.
- Use the provided
codeto complete token exchange for OAuth. - Required and optional scopes are already included in the install URL. If you need to use conditional scopes, you’ll need to initiate a separate secondary install flow.
- Store any necessary configuration data associated with the user’s HubSpot account.
3
Redirect back to HubSpot
Redirect the user back to the
returnUrl provided in the installation request. Redirecting back to HubSpot is required to avoid an infinite login loop.Customer perspective
- In your HubSpot account, click the marketplace icon in the top navigation bar, then select HubSpot Marketplace.
- Click an app card.
- In the top left, click Install.
- In the dialog box, review the app’s requirements, then select the checkbox and click Connect app.

- Once the app is installed, you can start using the app:
- Click Explore app features to start from the Feature Discovery section of the app overview page in your Connected Apps settings.
- Click Customize app cards to start customizing the app’s app cards.
- Click the X in the top right to return to the app listing page.

Understand the Seamless install flow with partner sign in
Use the Seamless install flow
- In your HubSpot account, navigate to Development. In the left sidebar menu, click App Listings.
- Hover over an app, then click the More dropdown menu and select Edit draft.
- In the app listing editor, select Seamless install in the Install experience section:
- Click the Install Button URL dropdown menu and select a URL. These URLs are populated from the redirect URLs set in your app settings.
- In the Sign-in configuration section, select Include partner sign-in.
Developer perspective
1
Receive initial installation request
Your install URL endpoint receives a request with these parameters:
step=authorize: indication that this is the initial step in the installation process.returnUrl: URL used to direct the user back to HubSpot after the authentication process completes. ThereturnUrlwill be added as a query parameter to the end of the Redirect URL selected in the listing editor when we redirect the customer there.- Example URL:
2
Authorize user
- Get the
stepandreturnUrlfrom the URL parameters, then show a login form or page to authenticate the user.
3
Generate security token
Once the user has authenticated, you should:
- Generate a cryptographically secure, randomized token unique to this user. This is the
statetoken used in future steps. - For example:
4
Save the state token and associate it with the user
- One option is to create a data table without RLS that stores the user’s
uidfrom your system and thestatetoken. - If you are using cookies, tag the cookies with SameSite=none.
- For security, it’s recommended to have a
statetoken with a relatively short expiration window, such as 10 minutes.
5
Add scopes
- Required and optional scopes are already present in the install URL.
- If you need to specify conditional scopes, it’s recommended to include them in the
scopequery parameter. You can add scopes to this parameter as a list of scope names, separated by spaces.
6
Redirect back to HubSpot
- Add the
statetoken you generated in the previous step to thereturnUrlas a query parameter, as well as thescopeparameter if you’re using it, then redirect the user back to HubSpot. The redirect will look like this:${returnUrl}?state=${state}. Redirecting back to HubSpot is necessary to avoid an infinite login loop. - For example:
7
Receive final installation request
Your install URL endpoint receives a request with these parameters:
step=finalize: indication that this is the final step in the installation process.code: the OAuth code HubSpot uses to generate your tokens.state: the secure token you generated in Step 3.returnUrl: URL used to direct the user back to HubSpot after the authentication process completes.
8
Get parameters from the URL
- Get the
step,code,state, andreturnUrlparameters from the URL.
9
Retrieve the user account associated with the state token
- Validate that the
statetoken matches the original authentication request. - Retrieve the associated user account.
10
Finish the process
- If you are able to verify the
statetoken, complete the installation:- Exchange the
codefor OAuth access and refresh tokens. - Redirect the customer to the
returnUrl. Without this step, the user will be stuck in an infinite login loop.
- Exchange the
- If you are not able to verify the
statetoken, do not complete the installation.- Redirect the customer to the
returnUrl. Without this step, the user will be stuck in an infinite login loop.
- Redirect the customer to the
Customer perspective
- In your HubSpot account, click the marketplace icon in the top navigation bar, then select HubSpot Marketplace.
- Click an app card.
- In the top left, click Install.
- In the dialog box, click Sign in to sign up or log in to the app.

- In the new window, finish the app’s sign up / log in process externally.

- After being redirected back to HubSpot, review the app’s requirements, then select the checkbox and click Connect app.

- Once the app is installed, you can start using the app:
- Click Explore app features to start from the Feature Discovery section of the app overview page in your Connected Apps settings.
- Click Customize app cards to start customizing the app’s app cards.
- Click the X in the top right to return the app listing page.

Understand the Login via partner site install flow
Developer perspective
- In your HubSpot account, navigate to Development. In the left sidebar menu, click App Listings.
- Hover over an app, then click the More dropdown menu and select Edit draft.
- In the app listing editor, select the Login via partner site option in the Install experience section.
- In the Install button URL field, enter the URL of the external page where customers can install your app. This link should not direct to your homepage or your setup documentation.
Customer perspective
- In your HubSpot account, click the marketplace icon in the top navigation bar, then select HubSpot Marketplace.
- Click an app card.
- In the top left, click Install.
- In the new window that opens, install the app from the developer’s website.
- When the installation is complete, return to HubSpot.
Understand the No install button flow
Developer perspective
- In your HubSpot account, navigate to Development. In the left sidebar menu, click App Listings.
- Hover over an app, then click the More dropdown menu and select Edit draft.
- In the app listing editor, select the No install button option in the Install experience section.
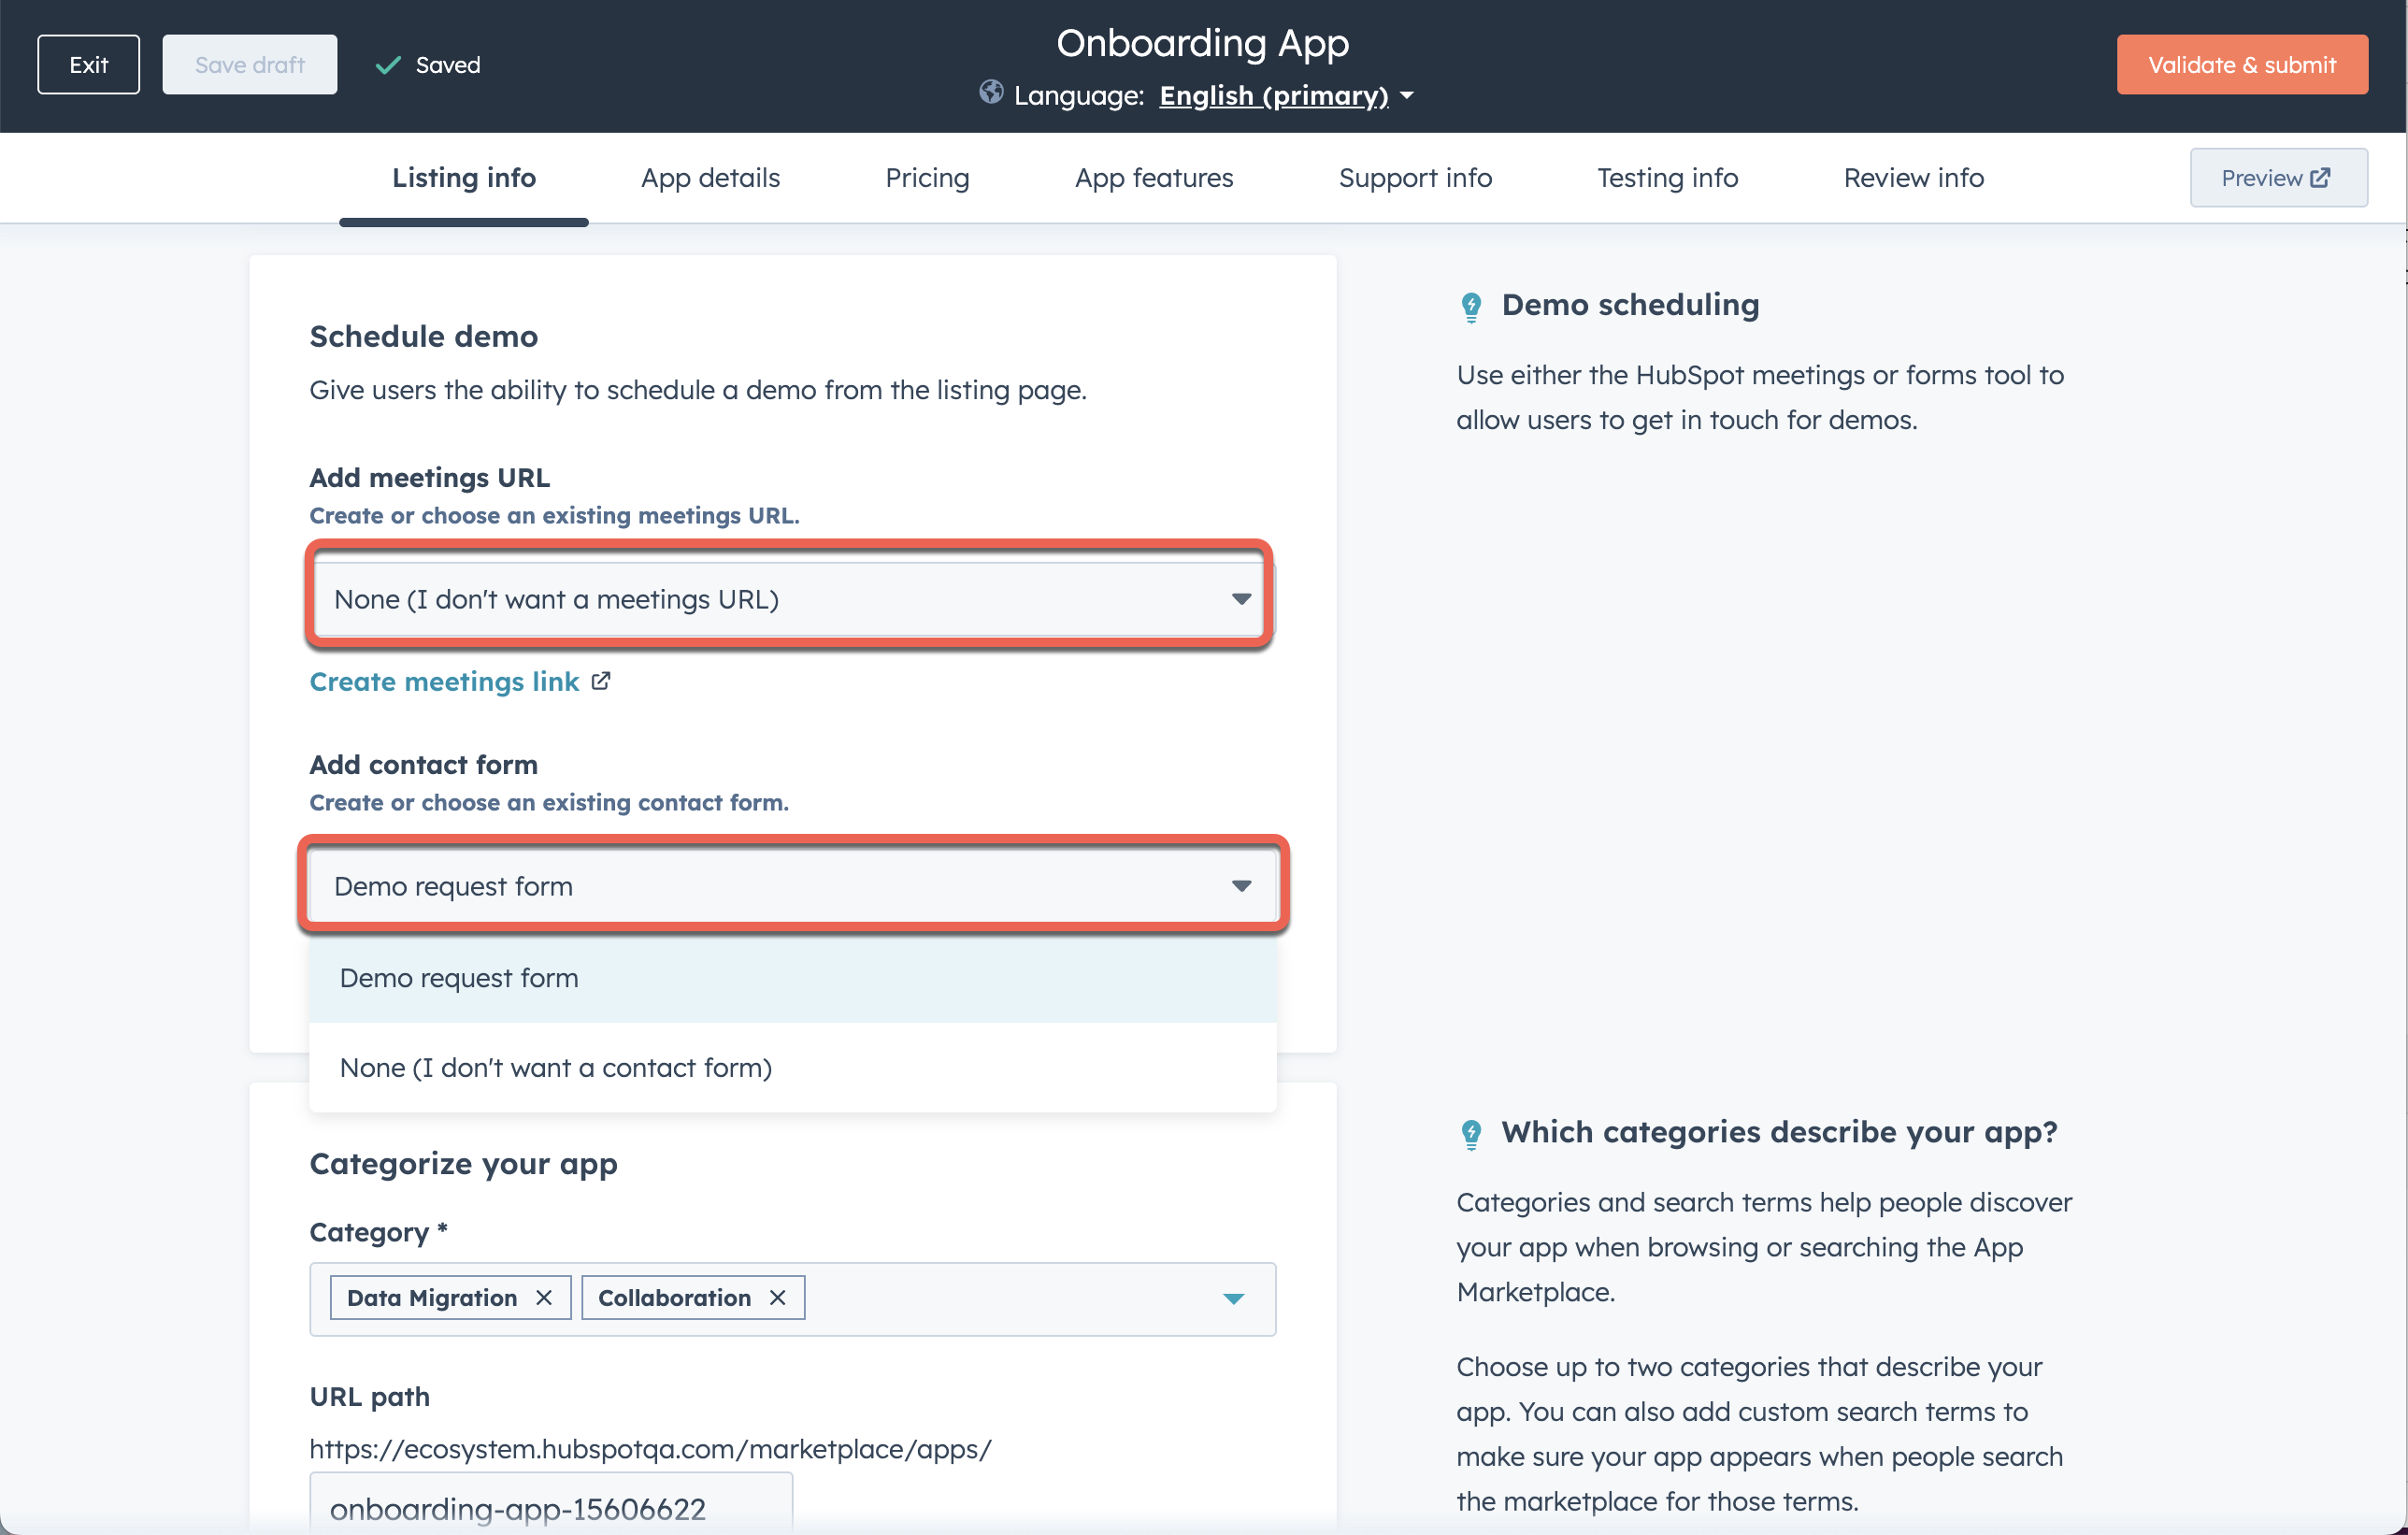
- To add a meetings link, click the Add meetings URL dropdown menu and select a scheduling page. To create a new scheduling page, click Create meetings link. Learn more about working with scheduling pages.
- To add a form, click the Add contact form dropdown menu and select a form. To create a new form, click Create contact form. Learn more about working with contact forms.
Customer perspective
- In your HubSpot account, click the marketplace icon in the top navigation bar, then select HubSpot Marketplace.
- Click an app card.
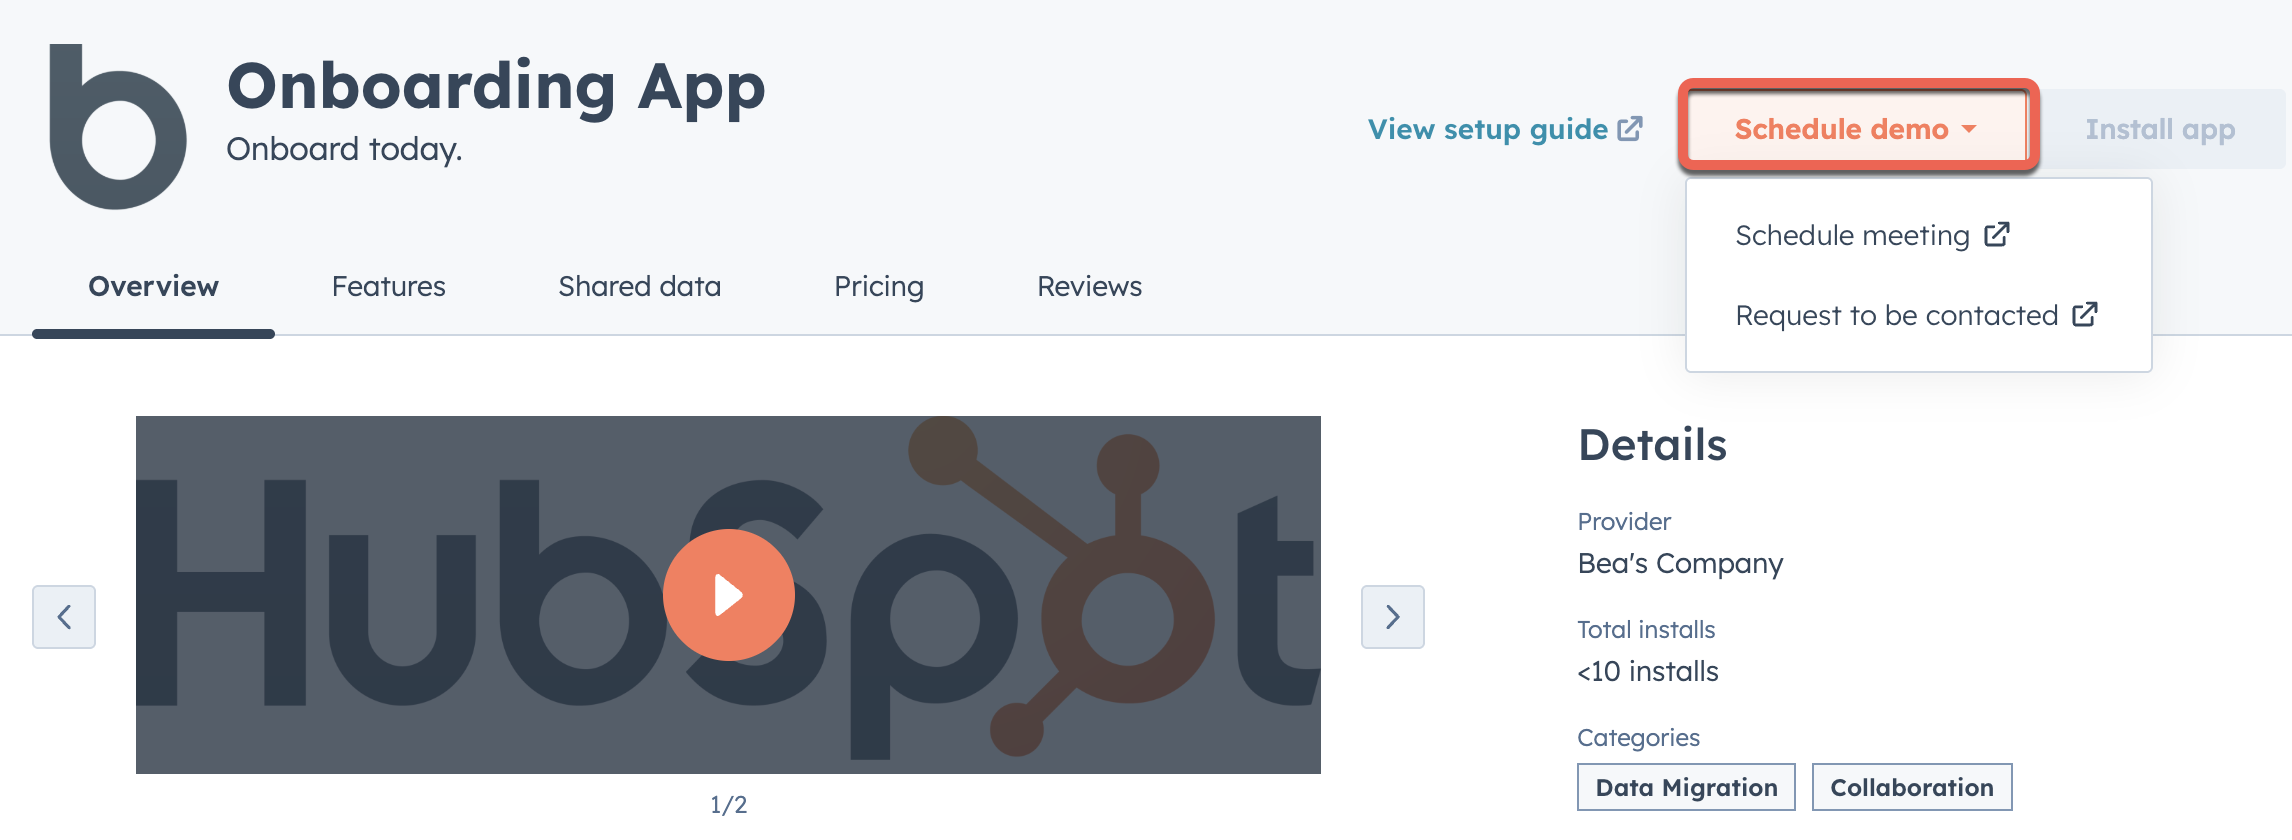
- In the top right, click Schedule demo.
- If multiple options are available, click the Schedule demo dropdown menu and select Schedule meeting or Request to be contacted.
Preview the install flow
Once you have opted into using the new install flow, you can test the installation process from the listing editor before publishing your changes:- In your HubSpot account, navigate to Development. In the left sidebar menu, click App Listings.
- Hover over an app, then click the More dropdown menu and select Edit draft.
- In the top right, click Preview.
- Run through a test version of the installation process.